Je pars du principe que vous maîtrisez un minimum Docker avec Portainer 😉
¶ 1. Fail2ban, qu’est-ce que c’est ?
Fail2ban est un service qui analyse en temps réel les journaux d’évènement de divers services (SSH, Apache, FTP, entre autres) à la recherche de comportements malveillants. Il permet d’exécuter une ou plusieurs actions (comme bannir une adresse IP) lorsqu’un nombre défini d’événements malveillants est détecté.
La suite, c’est ICI.
¶ Liens utiles
- Site officiel
- Wikipédia
- Docker Linuxserver.io sur DockerHub
- Docker par CrazyMax sur GitHub (image utilisée pour la suite)
¶ 2. Configuration du Fichier docker-compose.yml
Pour déployer Fail2ban, nous allons créer un répertoire de travail et le fichier de configuration Compose qui liera le conteneur Fail2ban aux logs de NPM.
- Partons du principe que l’on déploie avec Docker, nous créons un répertoire “fail2ban” :
mkdir fail2ban
- On se place dedans :
cd fail2ban
- On crée notre fichier docker-compose.yml :
nano docker-compose.yml
- On colle ce qui suit (mon fichier .yml docker-compose personnel) :
version: "3.7"
services:
  fail2ban:
    image: crazymax/fail2ban:latest
    container_name: fail2ban
    network_mode: host
    cap_add:
      - NET_ADMIN
      - NET_RAW
    volumes:
      - ./data:/data
      - /data/compose/1/data/logs:/var/log:ro
    environment:
      - TZ=Europe/Brussels
      - F2B_LOG_TARGET=STDOUT
      - F2B_LOG_LEVEL=INFO
      - F2B_DB_PURGE_AGE=28d
    restart: always
¶ Détail des lignes cruciales
| Ligne | Description |
|---|---|
network_mode: host |
Nécessaire pour que Fail2ban puisse manipuler les règles iptables sur l’hôte. |
cap_add: NET_ADMIN, NET_RAW |
Droits étendus requis pour la gestion des pare-feux et des paquets réseau par Fail2ban. |
- ./data:/data |
Montage essentiel : Ce volume contient les fichiers de configuration de Fail2ban (action.d, filter.d, jail.d). |
- /data/compose/1/data/logs:/var/log:ro |
Ligne à modifier ! C’est l’emplacement des logs de NPM sur l’hôte, monté en lecture seule (:ro) dans le conteneur. (Le chemin /data/compose/1/ indique un déploiement Portainer). |
- F2B_DB_PURGE_AGE=28d |
Purge la base de données interne de Fail2ban tous les 28 jours (par défaut à 1). |
ATTENTION : La ligne
- /data/compose/1/data/logs:/var/log:roest la plus importante ! Si vous ajoutez Fail2ban au compose de Nginx Proxy Manager sans avoir modifié les volumes de ce dernier, la ligne sera plutôt :- ./data/logs:/opt/log
¶ 3. Configuration de Fail2ban : Actions, Filtres et Jails
Les répertoires de travail action.d, filter.d et jail.d se trouvent dans le volume monté localement (ici ./data).
¶ 3.1. Fichier d’Action (action.d/docker-action.conf)
Une action définit l’outil ou le script exécuté lors de la détection d’une intrusion. Ici, nous définissons des règles iptables pour l’environnement Docker.
- Dans le répertoire
action.d, vous allez créer un fichierdocker-action.conf, et coller ce qui suit :
[Definition]

actionstart = iptables -N f2b-npm-docker
              iptables -A f2b-npm-docker -j RETURN
              iptables -I FORWARD -p tcp -m multiport --dports 0:65535 -j f2b-npm-docker

actionstop = iptables -D FORWARD -p tcp -m multiport --dports 0:65535 -j f2b-npm-docker
             iptables -F f2b-npm-docker
             iptables -X f2b-npm-docker

actioncheck = iptables -n -L FORWARD | grep -q 'f2b-npm-docker[ \t]'

actionban = iptables -I f2b-npm-docker -s <ip> -j DROP

actionunban = iptables -D f2b-npm-docker -s <ip> -j DROP
¶ 3.2. Fichier de Filtre (filter.d/npm.conf)
Un filtre est une expression régulière (failregex) utilisée pour scanner les logs et détecter les tentatives d’intrusion.
- Dans le répertoire
filter.d, vous allez créer un fichiernpm.conf, et coller ce qui suit :
[INCLUDES]

[Definition]

#failregex = ^\s*(?:\[\] )?\S+ \S+ (?:[4-5]0\d) - \S+ \S+ \S+ "[^"]*" \[Client <ADDR>\] (?:\[\w+ [^\]]*\] )*\[Sent-to <F-CONTAINER>[^\]]*</F-CONTAINER>\] "<F-USERAGENT>[^"]*</F-USERAGENT>"

failregex = ^\s*(?:\[\] )?\S+ \S+ (?:(?P<nf>404)|[4-5]0(?!4)\d|504) - \S+ \S+ \S+ "(?(nf)/(?:[^/]*/)*[^\.]*(?!\.(?:png|txt|jpg|ico|js|css|ttf|woff|woff2)[^\."]*)|[^"]*)" \[Client <ADDR>\] (?:\[\w+ [^\]]*\] )*\[Sent-to <F-CONTAINER>[^\]]*</F-CONTAINER>\] "<F-USERAGENT>[^"]*</F-USERAGENT>"
Note sur les Regex : Ces deux expressions régulières ont été écrites spécifiquement pour NPM. Le second regex ignore les erreurs 404/504 si elles portent sur des fichiers statiques courants (
png,jpg,css,js, etc.), réduisant ainsi les faux positifs.
¶ 3.3. Fichier Jail (jail.d/npm.local)
La Jail est le fichier de configuration principal qui lie le filtre à l’action et définit les règles de bannissement. La section [DEFAULT] gère les paramètres généraux.
- Dans le répertoire
jail.d, vous allez créer un fichiernpm.local, et coller ce qui suit :
[DEFAULT]

# "bantime.increment" allows to use database for searching of previously banned ip's to increase a
# default ban time using special formula, default it is banTime * 1, 2, 4, 8, 16, 32...
bantime.increment = true


# "bantime.rndtime" is the max number of seconds using for mixing with random time
# to prevent "clever" botnets calculate exact time IP can be unbanned again:
bantime.rndtime = 1200


# "bantime.maxtime" is the max number of seconds using the ban time can reach (don't grows further)
#bantime.maxtime =


# "bantime.factor" is a coefficient to calculate exponent growing of the formula or common multiplier,
# default value of factor is 1 and with default value of formula, the ban time
# grows by 1, 2, 4, 8, 16 ...
bantime.factor = 1


# "bantime.formula" used by default to calculate next value of ban time, default value bellow,
# the same ban time growing will be reached by multipliers 1, 2, 4, 8, 16, 32...
bantime.formula = ban.Time * (1<<(ban.Count if ban.Count<20 else 20)) * banFactor

# more aggressive example of formula has the same values only for factor "2.0 / 2.885385" :
#bantime.formula = ban.Time * math.exp(float(ban.Count+1)*banFactor)/math.exp(1*banFactor)


# "bantime.multipliers" used to calculate next value of ban time instead of formula, coresponding
# previously ban count and given "bantime.factor" (for multipliers default is 1);
# following example grows ban time by 1, 2, 4, 8, 16 ... and if last ban count greater as multipliers count,
# always used last multiplier (64 in example), for factor '1' and original ban time 600 - 10.6 hours
#bantime.multipliers = 1 2 4 8 16 32 64

# following example can be used for small initial ban time (bantime=60) - it grows more aggressive at begin,
# for bantime=60 the multipliers are minutes and equal: 1 min, 5 min, 30 min, 1 hour, 5 hour, 12 hour, 1 day, 2 day
#bantime.multipliers = 1 5 30 60 300 720 1440 2880


[npm]
enabled = true
ignoreself = true
ignoreip =  127.0.0.1/8 ::1 # A good idea is to mention your LAN IP address range (example: 192.168.2.0/24) as well as your WAN IP.
chain = DOCKER-USER
logpath = /var/log/proxy-host-*_access.log
maxretry = 5
findtime = 1h
bantime  = 10h
action = docker-action
¶ Explications des paramètres de la Jail [npm]
| Paramètre | Valeur | Explication |
|---|---|---|
ignoreip |
127.0.0.1/8 ::1 |
Adresses IP à ne jamais bannir. Ajoutez ici votre plage IP LAN (ex: 192.168.2.0/24) et votre IP WAN ! |
chain |
DOCKER-USER |
Indique la chaîne iptables à cibler dans un environnement Docker. |
logpath |
/var/log/proxy-host-*_access.log |
Chemin du log NPM à l’intérieur du conteneur Fail2ban. |
maxretry |
5 |
Nombre maximal de tentatives échouées avant bannissement. |
findtime |
1h |
Période de temps pour compter les tentatives (maxretry). |
bantime |
10h |
Durée initiale du bannissement. |
action |
docker-action |
Nom de l’action à exécuter (correspond à docker-action.conf). |
¶ Incrémentation du temps de bannissement (Section [DEFAULT])
L’option bantime.increment = true est activée pour durcir les bannissements en cas de récidive :
- La formule par défaut (
bantime.formula) utilise un facteur qui double la durée du bannissement à chaque fois (1, 2, 4, 8, 16, etc. fois la durée initiale). bantime.rndtime = 1200ajoute jusqu’à 20 minutes (1200 secondes) de temps aléatoire au bannissement pour contrer les robots qui calculent l’heure exacte de la levée d’interdiction.
¶ 4. Lancement et Commandes Utiles
- Il est plus que temps de créer et de lancer notre conteneur :
docker compose up -d
¶ Commandes de gestion de Fail2ban (via le conteneur)
Je vais vous donner quelques commandes sympas à utiliser directement via le conteneur.
- Status Jail (Général) : Affiche l’état des jails actives.
docker exec -t fail2ban fail2ban-client status
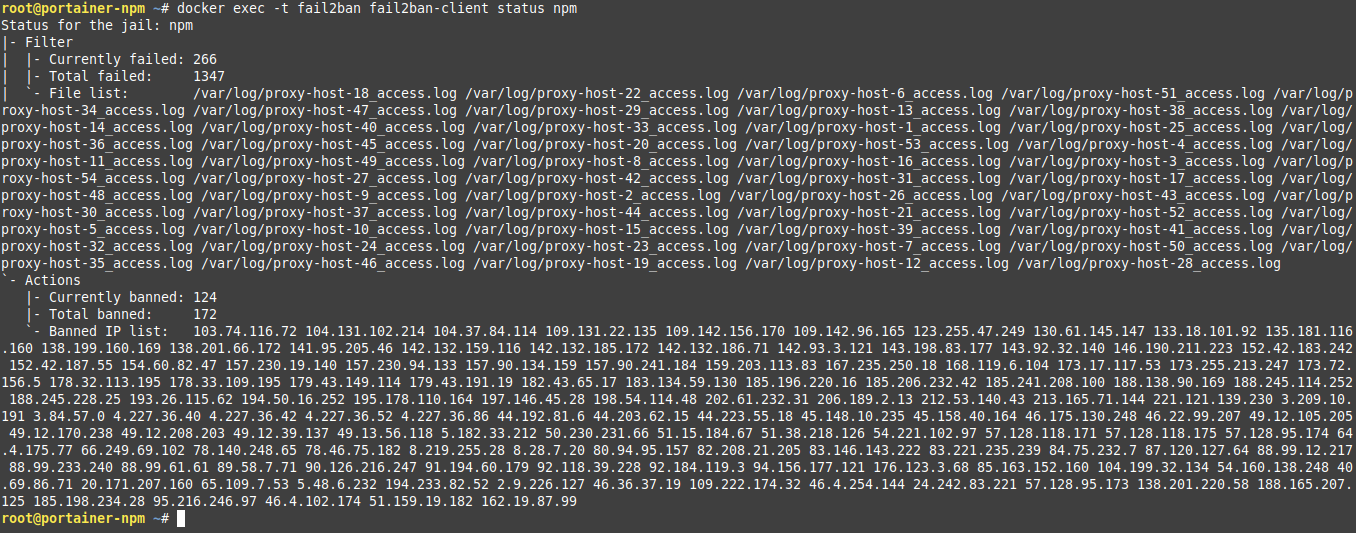
- Status Jail NPM (Détaillé) : Affiche le nombre d’IPs bannies pour la jail NPM.
docker exec -t fail2ban fail2ban-client status npm
- Recherche de requêtes d’une IP bannie (sur l’hôte) :
grep <IP-ADRESS> /EMPLACEMENT/RĖPERTOIRE/LOGS/proxy-host-*_access.log
⇒ Ce qui donne chez moi avec un exemple :
grep 20.171.207.160 /data/compose/1/data/logs/proxy-host-*_access.log
- Ban list : Affiche la liste de toutes les IPs bannies.
docker exec -t fail2ban fail2ban-client banned
- Ban IP : Bannit manuellement une IP.
docker exec -t fail2ban fail2ban-client set npm banip <IP>
- UnBan IP : Lève manuellement le bannissement d’une IP.
docker exec -t fail2ban fail2ban-client set npm unbanip <IP>
- Fail2Ban version :
docker exec -t fail2ban fail2ban-client version
- Aide complète :
docker exec -t fail2ban fail2ban-client --help
¶ 5. Bonus : Autres Configurations de la Jail
Voici trois configurations alternatives pour le fichier jail.d/npm.local qui proposent différentes approches pour l’incrémentation de la durée de bannissement.
Le fichier compose ainsi que l’ensemble des fichiers de configurations sont également disponibles sur ByteStash Blabla Linux, ICI. Une version optimisée des fichiers de configurations (filter.d et jail.d) est également disponible sur ByteStash Blabla Linux, ICI.
¶ 5.1. bantime.multipliers (Croissance exponentielle agressive)
Cette configuration utilise des multiplicateurs basés sur les minutes pour une croissance agressive du temps de bannissement, notamment utile avec un temps initial (bantime) plus court (ex: 1h).
[DEFAULT]

# "bantime.increment" allows to use database for searching of previously banned ip's to increase a
# default ban time using special formula, default it is banTime * 1, 2, 4, 8, 16, 32...
bantime.increment = true


# "bantime.rndtime" is the max number of seconds using for mixing with random time
# to prevent "clever" botnets calculate exact time IP can be unbanned again:
bantime.rndtime = 1200


# "bantime.maxtime" is the max number of seconds using the ban time can reach (don't grows further)
#bantime.maxtime =


# "bantime.factor" is a coefficient to calculate exponent growing of the formula or common multiplier,
# default value of factor is 1 and with default value of formula, the ban time
# grows by 1, 2, 4, 8, 16 ...
#bantime.factor = 1


# "bantime.formula" used by default to calculate next value of ban time, default value bellow,
# the same ban time growing will be reached by multipliers 1, 2, 4, 8, 16, 32...
#bantime.formula = ban.Time * (1<<(ban.Count if ban.Count<20 else 20)) * banFactor

# more aggressive example of formula has the same values only for factor "2.0 / 2.885385" :
#bantime.formula = ban.Time * math.exp(float(ban.Count+1)*banFactor)/math.exp(1*banFactor)


# "bantime.multipliers" used to calculate next value of ban time instead of formula, coresponding
# previously ban count and given "bantime.factor" (for multipliers default is 1);
# following example grows ban time by 1, 2, 4, 8, 16 ... and if last ban count greater as multipliers count,
# always used last multiplier (64 in example), for factor '1' and original ban time 600 - 10.6 hours
#bantime.multipliers = 1 2 4 8 16 32 64

# following example can be used for small initial ban time (bantime=60) - it grows more aggressive at begin,
# for bantime=60 the multipliers are minutes and equal: 1 min, 5 min, 30 min, 1 hour, 5 hour, 12 hour, 1 day, 2 day
bantime.multipliers = 1 5 30 60 300 720 1440 2880


[npm]
enabled = true
ignoreself = true
ignoreip =  127.0.0.1/8 ::1 # A good idea is to mention your LAN IP address range (example: 192.168.2.0/24) as well as your WAN IP.
chain = DOCKER-USER
logpath = /var/log/proxy-host-*_access.log
maxretry = 5
findtime = 1h
bantime  = 1h
action = docker-action
¶ 5.2. bantime.multipliers (Croissance par facteur de 2)
Utilisation d’une série de multiplicateurs qui double la durée de bannissement à chaque récidive.
[DEFAULT]

# "bantime.increment" allows to use database for searching of previously banned ip's to increase a
# default ban time using special formula, default it is banTime * 1, 2, 4, 8, 16, 32...
bantime.increment = true


# "bantime.rndtime" is the max number of seconds using for mixing with random time
# to prevent "clever" botnets calculate exact time IP can be unbanned again:
bantime.rndtime = 1200


# "bantime.maxtime" is the max number of seconds using the ban time can reach (don't grows further)
#bantime.maxtime =


# "bantime.factor" is a coefficient to calculate exponent growing of the formula or common multiplier,
# default value of factor is 1 and with default value of formula, the ban time
# grows by 1, 2, 4, 8, 16 ...
#bantime.factor = 1


# "bantime.formula" used by default to calculate next value of ban time, default value bellow,
# the same ban time growing will be reached by multipliers 1, 2, 4, 8, 16, 32...
#bantime.formula = ban.Time * (1<<(ban.Count if ban.Count<20 else 20)) * banFactor

# more aggressive example of formula has the same values only for factor "2.0 / 2.885385" :
#bantime.formula = ban.Time * math.exp(float(ban.Count+1)*banFactor)/math.exp(1*banFactor)


# "bantime.multipliers" used to calculate next value of ban time instead of formula, coresponding
# previously ban count and given "bantime.factor" (for multipliers default is 1);
# following example grows ban time by 1, 2, 4, 8, 16 ... and if last ban count greater as multipliers count,
# always used last multiplier (64 in example), for factor '1' and original ban time 600 - 10.6 hours
bantime.multipliers = 1 2 4 8 16 32 64

# following example can be used for small initial ban time (bantime=60) - it grows more aggressive at begin,
# for bantime=60 the multipliers are minutes and equal: 1 min, 5 min, 30 min, 1 hour, 5 hour, 12 hour, 1 day, 2 day
#bantime.multipliers = 1 5 30 60 300 720 1440 2880


[npm]
enabled = true
ignoreself = true
ignoreip =  127.0.0.1/8 ::1 # A good idea is to mention your LAN IP address range (example: 192.168.2.0/24) as well as your WAN IP.
chain = DOCKER-USER
logpath = /var/log/proxy-host-*_access.log
maxretry = 5
findtime = 1h
bantime  = 10h
action = docker-action
¶ 5.3. Désactivation de l’incrémentation (bantime.increment = false)
Cette configuration utilise uniquement le temps de bannissement initial (bantime = 10h), sans durcissement en cas de récidive.
[DEFAULT]

# "bantime.increment" allows to use database for searching of previously banned ip's to increase a
# default ban time using special formula, default it is banTime * 1, 2, 4, 8, 16, 32...
#bantime.increment = true


# "bantime.rndtime" is the max number of seconds using for mixing with random time
# to prevent "clever" botnets calculate exact time IP can be unbanned again:
bantime.rndtime = 1200


# "bantime.maxtime" is the max number of seconds using the ban time can reach (don't grows further)
#bantime.maxtime =


# "bantime.factor" is a coefficient to calculate exponent growing of the formula or common multiplier,
# default value of factor is 1 and with default value of formula, the ban time
# grows by 1, 2, 4, 8, 16 ...
#bantime.factor = 1


# "bantime.formula" used by default to calculate next value of ban time, default value bellow,
# the same ban time growing will be reached by multipliers 1, 2, 4, 8, 16, 32...
#bantime.formula = ban.Time * (1<<(ban.Count if ban.Count<20 else 20)) * banFactor

# more aggressive example of formula has the same values only for factor "2.0 / 2.885385" :
#bantime.formula = ban.Time * math.exp(float(ban.Count+1)*banFactor)/math.exp(1*banFactor)


# "bantime.multipliers" used to calculate next value of ban time instead of formula, coresponding
# previously ban count and given "bantime.factor" (for multipliers default is 1);
# following example grows ban time by 1, 2, 4, 8, 16 ... and if last ban count greater as multipliers count,
# always used last multiplier (64 in example), for factor '1' and original ban time 600 - 10.6 hours
#bantime.multipliers = 1 2 4 8 16 32 64

# following example can be used for small initial ban time (bantime=60) - it grows more aggressive at begin,
# for bantime=60 the multipliers are minutes and equal: 1 min, 5 min, 30 min, 1 hour, 5 hour, 12 hour, 1 day, 2 day
#bantime.multipliers = 1 5 30 60 300 720 1440 2880


[npm]
enabled = true
ignoreself = true
ignoreip =  127.0.0.1/8 ::1 # A good idea is to mention your LAN IP address range (example: 192.168.2.0/24) as well as your WAN IP.
chain = DOCKER-USER
logpath = /var/log/proxy-host-*_access.log
maxretry = 5
findtime = 1h
bantime  = 10h
action = docker-action